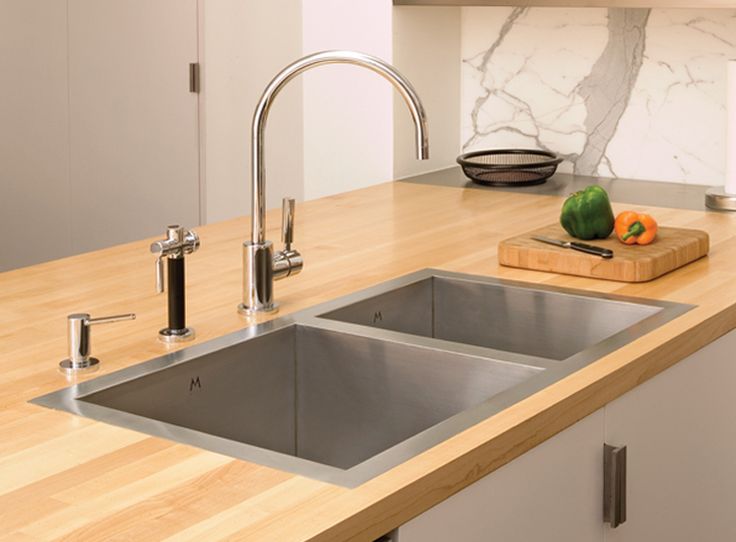
Undermount sinks are the new cool addition to kitchen aesthetics. They are practical in use and will stay in fashion even after a decade or two. Thanks to their convenience. Undermount sinks are a lot different from inner mount sinks. Inset sinks are placed on the top of your kitchen countertop, whereas an undermount sink is installed under the countertop. First, the countertop is cut to fit the sink’s bowl, and then the installation process follows.
Undermount sinks are a part of modern kitchen designs. Designers and users prefer them because there is no lip to catch dust, and they are easier to clean up. You can style your modern kitchen in many ways, including playing with the wall colours to installing countertops. As an advantage, you can install an undermount sink on any countertop such as Caesarstone, granite, soapstone, etc. In addition, using a kitchen sink with a countertop adds to the aesthetics of your kitchen because they are hidden under the countertop. Read on to find out how you can install undermount sinks.


Method of Installing an Undermount Sink
Below are the methods of installing an undermount sink countertop:
Step 1: Measure and Cut the Countertop
If you install the sink in a pre-cut countertop or replace the older sink, you should measure the hole. It is better to replace the older sink with a new sink of the same size. For people who will drill a new hole in their countertop, measure the sink’s length and width and make a hole in the countertop. Note that undermount sinks work best with hard countertops such as granite; quartz gives their strength. In addition, they can easily hold the weight.
Additionally, you should figure out the right spot for your sink when installing the sink on a new countertop. Check the water supply and drainage system to decide the spot. Another factor that affects the place is the overall aesthetic of your kitchen. Many people like it in the idle, whereas some like to place the sink on the corner.
Step 2: Choose the Reveal Style
Reveal style determines the amount of rim to stay visible after installation of the sink. There are three kinds of reveal styles; positive, 0, and negative. Positive reveal has half the rim visible. 0 reveal has the rim connected edge to edge with the countertop, and in the negative reveal, the rim is directly hidden under the countertop.
Step 3: Trace and Cut the Countertop to the Sink Size
Most countertops come with cardboard outlines for you to use and trace the size on the countertop. Additionally, you can also use the tools available for measuring and tracking the outline on the countertop.
Now, use a jigsaw or a circular saw to cut out the countertop for making the perfect size hole to fit your sink. We suggest you hire a professional for cutting stones and concrete for a clean cut. They are delicate and expensive. So any wrong cut on them would not look good on them. Ensure that the fabricator has the exact measurements, or else you lose your sink countertop.
Step 4: Clean Your Sink and Edges of the Countertop with Denatured Alcohol
Cleaning your countertop is an important part of installing the undermount sink. Here are the steps:
- You need to eliminate the old caulk and any existing debris from the saw.
- Now, use a scraper to rub off any dirt, debris, and particles from the countertop.
- You can scrap dried adhesive by dipping a rag in denatured alcohol and rubbing the edges and countertop with it.
Step 5: Place the Sink
Place the sink from above the hole into the hole in the countertop. Ensure to align the sink rim with the countertop edge according to the style you have chosen. You need not worry about edges for the sake of the negative reveal. However, considering the zero and positive reveal, there is a need for you to be very careful with the edges and their alignment.
For positive reveal, ensure that an equal rim is visible from all the ends. You can take a measurement and mark the rim of the sink beforehand to place it properly. Now use support to keep the sink in place while you finish the installation process. Finally, you can use adjustable bar clamps with a wooden board to fit the sink in one place.
Step 6: Glue the Studs and Spread the Calk
Now, when the sink is set, you have to glue the studs in each corner of the sink. Depending on the size of the washbasin, you can adjust the number of studs you need. We suggest you use a stud at least 25 cm away. You can glue the studs using epoxy resin and hardener. Mix them in equal proportions and then apply the liquid underneath the sink with the studs.
To hold the sink in place for all longer durations, choose a waterproof caulk. You can buy a caulk from any hardware store. After gluing the studs, you can now spread the silicone caulk around the edges of the sink countertop. Again, putting pressure on the canister is recommended, so a thick layer of silicone caulk is released and spread around evenly.
Step 7: Tighten the Clamps
Before installing the clips on the sink, you have to tighten the clamps under the sink. The tightening of clamps will help you bring the sink close to the countertop. You can adjust the clamps until you are satisfied with the firmness of the sink. Ensure that you make all the adjustments while the caulk is still wet. It will become difficult to move the sink after it hardens.
Step 8: Install the Clips and Wipe Off Any Debris
The final step includes installing the sink clips to tighten them with wingnuts. These sink clips help in securing the sink to the countertop. Ensure that there are no leftover gaps between the countertop and sink. Tighten the wingnuts using your hand as overtightening can damage the sink and countertop.
Wipe off any debris and extra caulk or adhesive from the countertop and from within the sink by using denatured alcohol dampened rug. Ensure that the sink is clean before installing the faucets and other required accessories with the water lines. After you fit everything and all the wet material used has dried up, you can now turn on the water supply to check the drainage and flow of water.
Final Words:
Installing an undermount sink using DIY methods is easier when working with soft stones such as Caesarstone or soapstone. It would help if you had a lot of equipment for cutting, measuring, fixing, and cleaning the mess. Suppose you are skilled with the use of tools like saws, epoxy, etc. Then, you can follow the steps mentioned above to install an undermount sink countertop and give your kitchen a fresh look.


