Building a shed is not a piece of cake. It would help if you had perfect measurements, tools, and enough knowledge about how to build a shed. You need to follow safety measures along with creating a shed perfectly.
Materials are the foremost important thing you need. Without materials, there is no point in trying.

| MATERIALS | UNIT | Qty | SIZE | NOTES |
| Pressure-Treated Lumber 1”x2” | pcs | 3 | 10’ | Starter course |
| Pressure-Treated Lumber 1”x2” | pcs | 24 | 6’ | Starter course, Girts, Jalousies |
| Pressure-Treated Lumber 1”x2” | pcs | 2 | 8’ | Girts |
| Pressure-Treated Lumber 1″x3″ | pcs | 5 | 6’ | Trim |
| Pressure-Treated Lumber 1″x3″ | pcs | 5 | 10’ | Trim |
| Pressure-Treated Lumber 1″x3″ | pcs | 2 | 8’ | Girts |
| Pressure-Treated Lumber 1″x4″ | pcs | 4 | 8’ | Trim |
| Pressure-Treated Lumber 1″x4″ | pcs | 2 | 20’ | Trim |
| Pressure-Treated Lumber 1″x4″ | pcs | 4 | 6’ | Trim |
| Pressure-Treated Board 1″x6″ | pcs | 2 | 10’ | Facia |
| Pressure-Treated Board 1″x8″ | pcs | 1 | 10’ | Ridge board |
| Pressure-Treated Lumber 2″x2″ | pcs | 4 | 6’ | Girts |
| Pressure-Treated Lumber 2″x2″ | pcs | 3 | 8’ | Girts |
| Pressure-Treated Lumber 2″x2″ | pcs | 2 | 12’ | Girts |
| Pressure-Treated Lumber 2″x3″ | pcs | 4 | 10’ | Gable wall Stud |
| Pressure-Treated Lumber 2″x3″ | pcs | 7 | 8’ | Gable wall Stud, Trim, Girts |
| Pressure-Treated Lumber 2″x3″ | pcs | 5 | 6’ | Gable wall Stud, Girts |
| Pressure-Treated Lumber 2″x4″ | pcs | 3 | 12’ | Cripple studs |
| Pressure-Treated Lumber 2″x4″ | pcs | 36 | 6’ | Door Header, Bottom plates, Cripple stud, Studs, Window header, Rough sill, Collar tie, Girts |
| Pressure-Treated Lumber 2″x4″ | pcs | 22 | 8’ | Studs, Top plate |
| Pressure-Treated Lumber 2″x4″ | pcs | 9 | 10’ | Top plate, Bottom plate |
| Pressure-Treated Lumber 2″x6″ | pcs | 4 | 6’ | Rafters bay |
| Pressure-Treated Lumber 2″x6″ | pcs | 18 | 8’ | Rafters |
| Pressure-Treated Lumber 2″x8″ | pcs | 10 | 10’ | Joists, Rim joists |
| Pressure-Treated Lumber 4″x4″ | pcs | 4 | 8’ | Studs |
| Surface bolt (4″) | pcs | 4 | ||
| Poured concrete | lbs | 4 | 60 | |
| Concrete Brick Pavers | pcs | 140 | 3 5/8″ x 2 1/4″ x 8″ | |
| Building paper (#15) | roll | 4 | ||
| Asphalt shingles (250# per sq. min) | ft2 | 150 | ||
| Metal drip edge | ft | 20 | ||
| Wood siding boards (1/2″ x 6″) | ft2 | 85 | 9′-5″ | Siding |
| Wood siding boards (1/2″ x 6″) | ft2 | 135 | 9′-6 1/2″ | Siding |
| Wood siding boards (1/2″ x 6″) | ft2 | 13 | 2′-2 3/4″ | Siding |
| Window beading | ft | 8 | ||
| Glass (1/8″) | pcs | 1 | 2′-10 1/4″ x 2′-10 1/4″ | |
| Wall fastener (3″) | pcs | 4 | ||
| Door hinge (3″) | pcs | 18 | ||
| Door pull (6″) | pcs | 2 | ||
| Plywood (9/16″) | pcs | 28 | 4′x8′ | Sheathing |
| Window lock | pcs | 2 | ||
| Wood square louver gable vent (12″ x 12″) | pcs | 2 | ||
| Galvanized nails (1/2″) | pcs | 100 | ||
| Galvanized nails (2″) | pcs | 2000 | ||
| Wood screws (2″) | pcs | 1750 | ||
| Wood screws (3″) | pcs | 1200 | ||
| Wood screws (5″) | pcs | 500 |
It would take approximately four days to build
- There are 14 steps to build a shed you’ll need to follow.
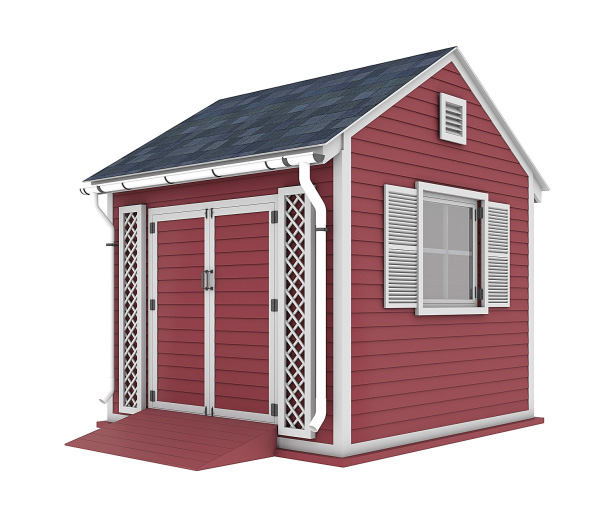
- The height of the shed would be 6’-11.”
How to build a shed at home in 10 easy steps
Step-1 How to build a shed foundation
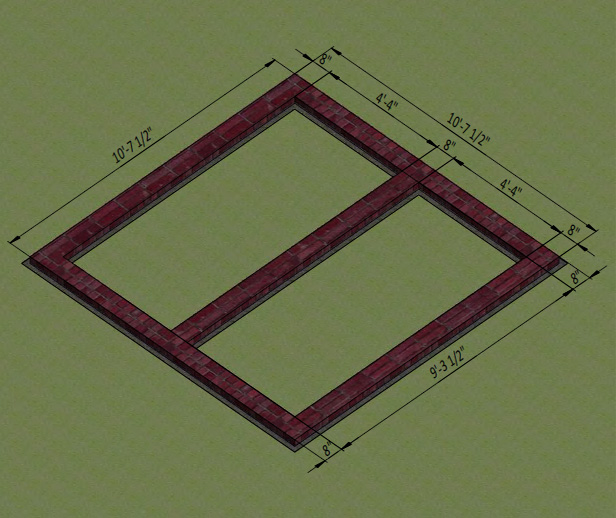
- Dig a footing trench approx 1’x1′ deep and wide.
- Fill the trench with concrete
- Now add mortar to hardened concrete and add bricks
- A single layer of bricks should be enough
- Keep count of bricks in your foundation. It should count up to 135 bricks
- Your foundation should measure 10’-7 ½” on each side
Step -2 floor frame assemble
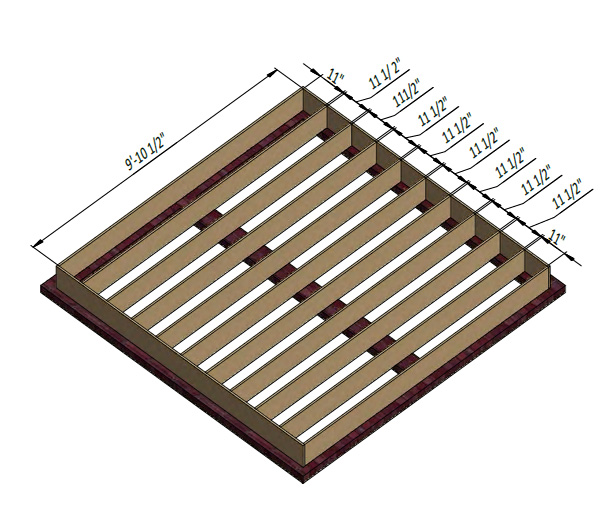
- Line up the floor’s plywood sheet by marking the 9′ joist every 11″
- Use 8×5″ Phillips wood screws in order to secure the joist.
- The corners should be at 90%
Now when your frame is stable, install it on the foundation.
Step 3 add sheeting to the floor
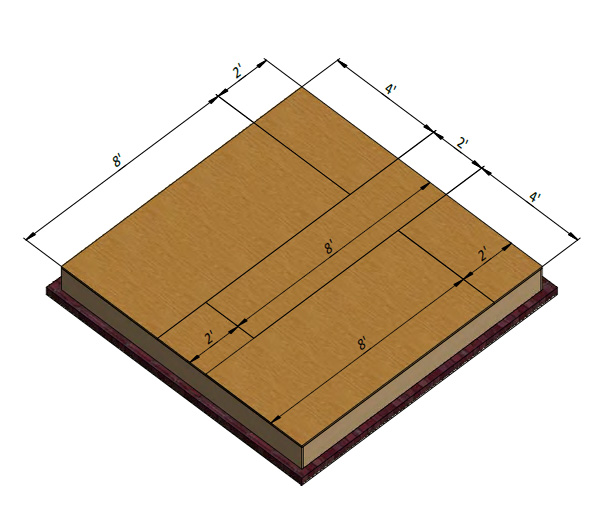
- Use a 4″ x8″ plywood sheet to cover the floor and cut the excess
- Use 2″ Philip head wood screws on the plywood to stabilize them.
- It’s better to use construction adhesive underneath the plywood sheet.
Step -4 frame the walls
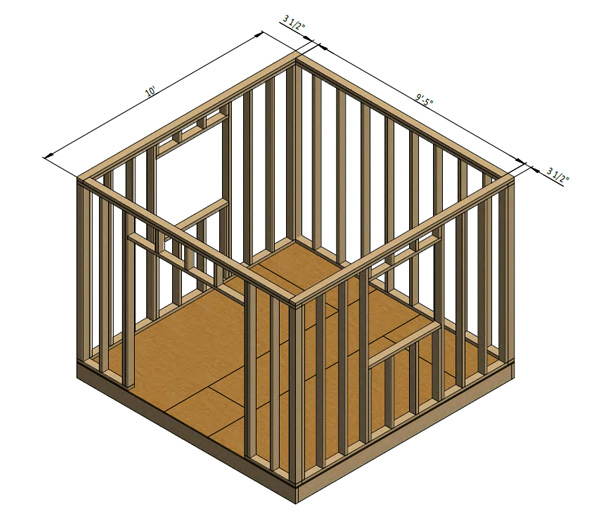
On the floor, we have a common joist and rim joist, but on the wall, we have studs and bottom and top plates, four each. Each of them should be 3 ½” wide and 10′ long.
- Lay out is somewhat similar to the floor layout, so follow that
- You need to screw the wall using flat head woods
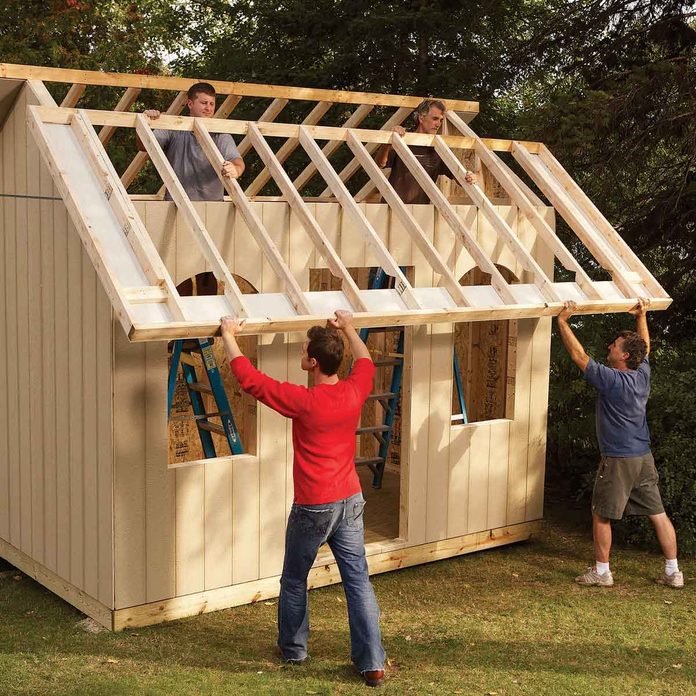
Step -5 assemble the roof frame
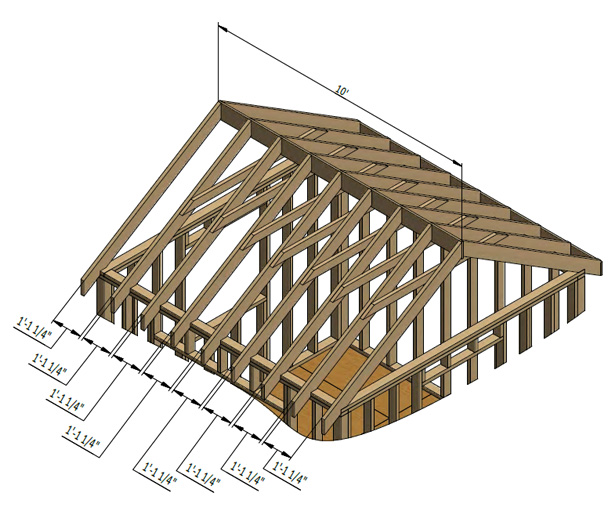
- Use 10′ pressured lumber to assemble the beams
- Connect the beams with flat head Philip wood screw
- Build the rafters by using 2×4 or 2×6
- Cut the rafters, collar ties, and ridge board as per your need or directions.
- Rafters should be 18 and measure 6’-11″ long.
- Try to space the raters at 1’-1′ ¼”. Also shown in the diagram above.
Step -6 Attach exterior siding to the side walls.
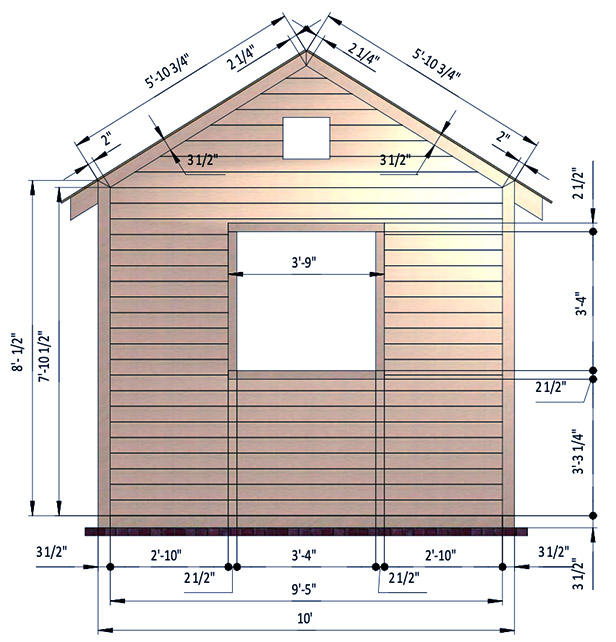
- Install wall trims by using 1×3 pressure-treated lumber. You’d need two boards cut to 5’x10 ¾” and two boards of 8’x ½”, and the last one cut to 10.’
- Install starter course 9’-5″ long from where the pressure treated lumber with cross-section 1/4″ x 3/4″.
- You should use 1/2 “x 6” siding boards for installing exterior sliding.
- You can use 2×3 pressure lumber for the window. You’ll need a total of 4 boards, two of 3’-9″ and the other two of 3’-4″.
Step -7 cover your roof frame with plywood.
- Get a ladder, a hammer, plywood, and some wooden screws.
- For the roof sheathing, the measurements should be 9/16″. You should also have four sheets of 4’x6′-11″ and two of 2′-5 3/4″ x 6′-11″.
- After placement, secure the plywood with 2″ flat head wood screws.
- Now decorate your rooftop as you like to, you can try rooftop shingles to give a fresh look to your rooftop.
Step- 8 Assemble the window
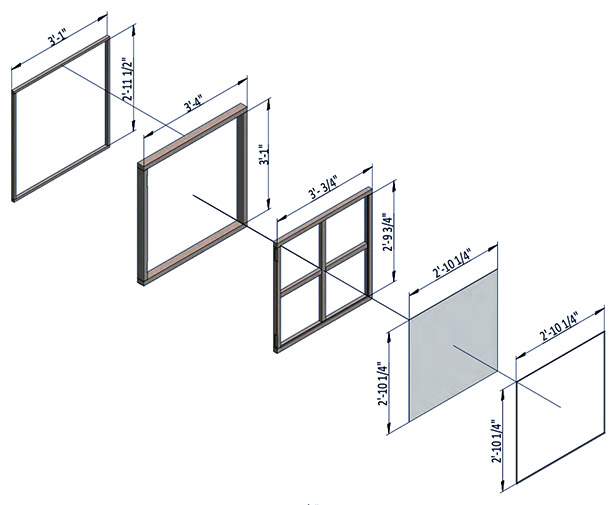
- Need a total of four boards, two horizontal with the measurement of 3′-3/4″ and two vertical measures to 2′-9 3/4″
- Use 2×3 pressure-treated lumber to assemble the outer frame of the window
- Make the inner frame using 2×2 pressure treated material and secure it using a 3″ flat head wood screw.
- Now lastly, install the glass in the window.
- Install the window by installing the two hinges (3″) with 6x 1″ wood screws.
Step- 10 build the doors.
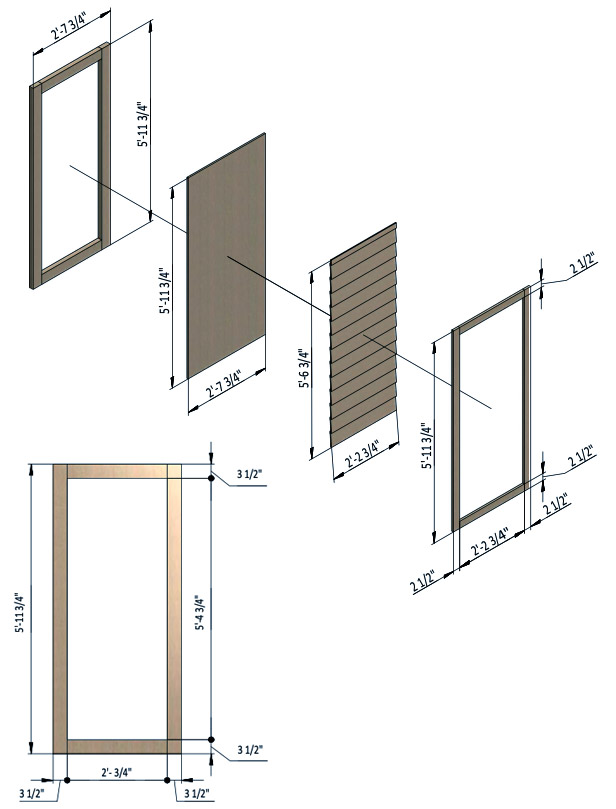
- Use 2×4 pressure-treated lumber to build the door frames and use a 5″ wood screw to fix it. You need four boards; Two of them should be vertical, 5′-11 3/4″, and the other one should be horizontally trimmed pieces.
- Use a 9/16″ plywood sheet measuring to 2′-7 3/4″ x 5′-11 3/4″.
- For door trim, use 1×3 pressure-treated lumber and screw it up with wooden screws. There are four pieces, 2 of them measure 2′-2 3/4″, and the other two measure 5′-11 3/4″.
- Cut and install the first course, which is 2’-2 ¾”. Don’t forget to use 1/4 x ¾”
- Now DIY, decorate with your father anytime.
Don’t forget to have a ventilation vent.


